
Root A Samsung Galaxy Note 3 SM-N900
If you have a Galaxy Note 3 SM-N900 and you have just updated it to Android 4.4.2 KitKat, you may have noticed that you have lost your root access. In this post, we’re going to show you how you can either regain your root access or gain it for the first time on an Galaxy Note 3 SM-N900.
צוגרייטן דיין מיטל:
- First, make sure you have a Samsung Note 3 SM-N900. You shouldn’t use this guide if you have a different device. Check your device’s model number by going to Settings>General>About Device.
- You need to be already running Android 4.4.2 KitKat on your device.
- מאַכן זיכער דיין טעלעפאָן איז באפוילן צו אַרום קסנומקס פּראָצענט.
- Have backups of your important media content, messages, contact and call logs.
- האָבן אַ אָעם דאַטן קאַבלע אַז איר קענען נוצן צו פאַרבינדן דיין מיטל צו אַ פּיסי.
- First, turn off your antivirus and firewall programs.
- געבן וסב דיבאַגינג.
באַמערקונג: די מעטהאָדס וואָס זענען דארף צו פלאַשט קאַסטאַמייזד רעקאָוועריעס, ראָמס און וואָרצל דיין טעלעפאָן קענען פירן צו בריקינג דיין מיטל. וואָרצל פון דיין מיטל וועט אויך אָפּשאַפן די וואָראַנטי, און עס קען נישט זיין בארעכטיגט פֿאַר פריי מיטל באַדינונגס פון מאַניאַפאַקטשערערז אָדער וואָראַנטי פּראַוויידערז. זיין פאַראַנטוואָרטלעך און האַלטן דאָס אין זינען איידער איר באַשליסן צו נעמען דיין אייגענע פֿאַראַנטוואָרטלעכקייט. אין פאַל אַ ומגליק אַקערז, מיר אָדער די מיטל מאַניאַפאַקטשערערז זאָל קיינמאָל זיין פאַראַנטוואָרטלעך
דאַונלאָוד:
- אָדינקסנומקס ווקסנומקס.
- סאַמסונג וסב דריווערס
Root Method 1:
- Open אָדין.
- Put your device into download mode by first pressing and holding down the volume down, home and power buttons. When a warning appears on screen, press the volume up button.
- פאַרבינדן דיין טעלעפאָן צו די פּיסי.
- ווען אָדין דיטעקץ דיין טעלעפאָן, איר זאָל זען דעם שייַן: קאַם קעסטל ווענדן ליכט בלוי.
- Click the PDA tab and select the CF-autoroot file that you downloaded.
- Make sure your Odin looks like the photo below.
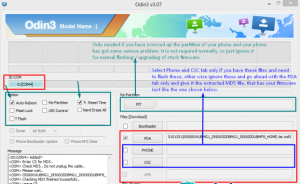
- Click start. You should see the progress in the process bar in the box above ID:Com
- When rooting process is finished, your phone should restart and you will see CF Auto Root installing SuperSu on your phone.
Root Method 2: With TWRP Recovery
- If you don’t have TWRP recovery yet, download and install it.
- Download SuperSu.zip file here.
- Place the downloaded file on the SD card of your phone
- Boot into TWRP recovery by first turning your phone off, then turn it on by pressing and holding volume up, home and power.
- “Install > select the SuperSu.zip”. SuperSu will flash.
- When SuperSu is finished flashing, reboot the device.
- Go to your App Draw and find SuperSu.
Check if rooting worked:
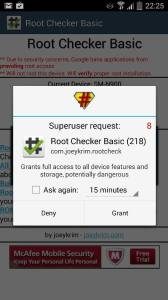
- Go to the Google Play Store and download וואָרצל טשעקער
- ינסטאַלירן רוט טשעקער
- עפֿן וואָרצל טשעקער
- צאַפּן אויף באַשטעטיקן וואָרצל.
- You will be asked for SuperSu rights, tap on Grant.
- איר זאָל איצט זען די וואָרצל אַקסעס וועראַפייד איצט.
האָבן איר איינגעווארצלט דיין מיטל?
שער דיין דערפאַרונג אין די באַמערקונגען קעסטל אונטן.
JR
[embedyt] https://www.youtube.com/watch?v=dcWkKuU9Fyo[/embedyt]


